What's It All About

Thursday, February 28, 2013

Tutorial Thursday for The Stamping Chef - Box Card

Welcome to Tutorial Thursday or as I fondly like to call it – Recipe Thursday for The Stamping Chef --- shall we see what’s cooking????

Today, I have whipped up a box card complete with step-by-step pictures and instructions. If you follow this, you too will have a super card to place a super digital design by The Stamping Chef. The Stamping Chef is having a super duper sale going on right now --- Buy 3 Get 1 Free. Also, there are always freebies to try before you buy!!!!

Here’s the finished product, just be patient with me with all the little steps (almost 100 – ok, just kidding!!!)


Supply List:


  • 8-1/2 x 11 inch piece of double sided patterned lightweight cardstock – do no be a doofus like I was and use a paper with sparkle as it has a tendency to cause hair pulling out!!!
  • Score Board – I used Martha Stewart’s
  • Scissors
  • Adhesive
  • Digital design- The Stamping Chef Hold On
  • Border punch – I used Martha Stewart Eyelet punch
  • Complimentary cardstock for oval mat and insert
  • Rubber Stamp

Alrighty, do we have our supplies??? Let’s get started


  • I used a 12 x 12 double-sided piece of paper and needed to trim to the necessary 8-1/2 x 11 inch


  • Place the patterned paper into the score board with the 8-1/2 inch on top scoring at 2-1/8 and 6-3/8 inch


  • Place the patterned paper with the 11 inch on top scoring at 1-1/4 and 3-3/8 inch. 


  • Repeat this step on the other side of the paper
  • Prefold the long score lines


  • Unfold your paper and keep the side that you wish to be the outside of the box facing you
  • Fold the two (2) score lines on the 8-1/2 inch side up. Flip the paper over and fold the second set of score lines down showing the pretty edge
  • Fold the short sides up


  • Take the upper corner of the just folded side and carefully fold it down diagonally – be careful not to rip the paper --- this is where you really notice that I was a doofus and using the paper with glitter and it is harder to fold


  • Repeat this step on all four (4) corners
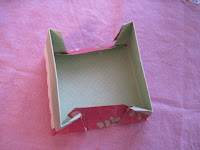
  • Unfold everything and you can see the box shape forming!!!


  • Adhere the decorative strip to the un-scored sides trimming to 4-inches that it is only placed in the center


  • Cut the corner rectangles diagonally from the long, un-scored sides toward the edge NOT completely but just on a slight angle. This ensures that parts of the side won’t show after you fold your box and eliminates a lot of bulk!!! (Gee, I wish I could do that with my body!!)


  • Take one of the corners next to the decorated side and fold it over to the long side
  • Repeat on the other corner of that SAME long side
  • Fold the long-side down
  • Repeat these steps on the other side


  • Fold sides down carefully --- ***HINT: this is actually a bit difficult without getting the added bulk but found that it works if you unfold and refold as the thinner the paper, the easier the folding


Now, we are going to add a belly band which is purely decorative and optional


  • Cut a strip to compliment your paper 2-inches by 10 inches adding adhesive to the one end – you would want to wrap the strip around the card keeping it loose enuf to slide the belly band off and on


  • Cut a piece 3-1/2 x 3-1/2 inches of a complimentary piece to place on the inside of your box. I chalked around the edges after I used my oval corner punch. A sentiment may be placed here and then glued to the center of the inside of your box


  • This was then glued on my belly band covering my over-lapped seam
  • My digital was then glued on my oval.

VIOLA …. A finished box card!!!!


Now, you may ask what use is a box card --- WELL, you can use it to put a gift card, little treasures such as diamond earrings (LOL, just wishful thinking), memory card for a camera or cell phone, or this one is going to get a few Action Wobbles, buttons, and lace to mail as a belated birthday gift to a friend!!!

I hope you enjoyed my tutorial today. My apologies for the length but I have found from prior experience each step is necessary or you have not only wasted your paper and your time!!!!! If you have any questions, please leave a comment below and I will be more than happy to assist you!!!!!!!!

God Bless you and thanks ever sew much for stopping by today and help me reach 400 followers as we shall P-A-R-T-Y!!!!!
Much love, hugs, and friendship
Lynne

Wednesday, February 27, 2013

Tsunami Rose Designs - Challenge Wednesday #9 Altered Item


 Tsunami Rose Designs Links 

Ahoy Mateys … I have a treasure today that has been locked and not able to be opened …. I found this little paper mache’ treasure chest while on a mission searching for an item to be used to alter using the lovely Miss Daisy’s papers and Challenge Wednesday and behold there it was this beautiful adorable little treasure chest to hold my secret treasures and jewels!!!!


Ingredient List:

  • Paper mache’ treasure box which measures 4.25 x 3 x 4 inches
  • Modge Podge
  • Sponge brush
  • Eiffel Tower Stamps from a previous swap
  • Roses from Michael’s Craft Store
  • Embellishments are Adhesive Glitter Shapes by Recollections
  • Black ¼ inch satin scalloped edge ribbon
  • Pink ½ inch twill tape
  • Black Recollection paper used for trim
  • Black metal beads for corners and front decoration by Recollections
  • Glue Dots 1/8 inch
God Bless you and thanks ever sew much for stopping by today. 
I'm ever sew sew close to 400 followers, please help me reach that magic number and then, let the P-A-R-T-Y BEGIN!!!
Much love, hugs, and friendship
Lynne

Friday, February 22, 2013

Just Ducky

If you're here for The Stamping Chef, Freebie Friday Cupcake, please, click here
If you're here for The Stamping Queen's Birthday Blog Hop, please, click here.

It’s a gloomy day in Pittsburgh. It doesn’t know if it wants to rain or snow. I knew I wanted to use Heather Valentin’s Digital Emily Little Duckies for her Favorite 2 Color Challenge and thought now is the time to bring out bright spring colors . . . . pink, yellow, and green.


RECIPE:
  • Card was cut 6 x 11 using Recollections Card Stock and then scored in half with Martha Stewart Scoreboard
  • Background was cut 5.75 x 5.375 and inking around the edges
  • Emily Little Duckies was colored using Spectrum Noir Markers, Prisma Colored Pencils, and Gel Pens
  • Lace is some that I had hand-dyed last summer
  • Sentiment was a freebie with Create with TLC
  • Little ducks are buttons from my stash
  • Rounded corners with corner punch on Emily and sentiment with inking around the edges
VIOLA … I have a card that is “just ducky” with a hint of spring! Hope you enjoy . . . .

God Bless you and thanks ever sew much for stopping by today and help me reach 400 followers as we shall P-A-R-T-Y!!!!!
Much love, hugs, and friendship
Lynne

This card being entered in the following challenge:
Lacy Sunshine Challenge Blog: Challenge #2 Favorite Color Combo

It's Freebie Friday at The Stamping Chef Cupcake

Welcome its time to party and if you're here to celebrate the QUEEN of The Stamping Chef, the lovely Miss Tamara, please click here!!! Happy Birthday Tamara!!! We Love Love Love YOU!!!

Its Freebie Friday at The Stamping Chef and has she cooked up a treat for you AND its her BIRTHDAY ….. but shhhh don’t tell  her I said sew. . . .

The freebie is called “CUPCAKE” . . . .


RECIPE:
  • Cricut Cartridge Sweet Treats Cupcake with heart topper card cut at 4.75 inches
  • Cupcake colored with Spectrum Noir Markers in pastels and then topped with Glossy Accents for the frosting
  • all paper piecing was made with scraps
  • inked around the edges of the sentiment and placed randomly on the bottom of the cupcake
  • hand-wrote "Birthday Wishes" on the banner

God Bless you and thanks ever sew much for stopping by today and help me reach 400 followers as we shall
P-A-R-T-Y!!!!!
Much love, hugs, and friendship
Lynne

Thursday, February 21, 2013

Happy Birthday to The Stamping Chef - Queen Tamara

If you are here for the Fire and Ice Blog hop, please click here. BUT, hope you take a few moments to check out our Surprise Birthday Blog Hop.

Welcome to our very special birthday blog hop for our Queen, Tamara. Today Miss Tamara is celebrating her “21st” birthday and the family wanted to celebrate with a surprise birthday hop. To help us out in the celebration we asked a few of our loyal followers to join in with us. I hope you all enjoy the hop and don’t forget to leave lots of Birthday Wishes for Tamara here on the blog  The hop will end on February 24th. One lucky participant will receive the digi used on the families projects, Gwenevere, all you have to do is leave a comment on all blogs and at the end (which is the stamping chef blog) comment that you have left some love for all . The winner will be posted on February 25th.


Here is the hop order for you:


For my project today, I have the lovely Queen dressed in a green frock and glammed it up with bling!!!


RECIPE:
  • Card was cut 6 x 12 using green Recollections and then scored in half with my Martha Stewart Score Board
  • Background of the card was cut 5.5 x 5.5 inches using Recollections Fashionably Chic
  • The Stamping Chef Gwenevare colored using my Spectrum Noir Markers, Prisma Colored Pencils, and Gel Pens
  • Rhinestones are from Miriam's Crafting Supplies 
Your next stop along the way is the extremely talented Vicky!!!!! Don't forget to leave your bloggie love at each step along the way!!!!

God Bless you and thanks ever sew much for stopping by today and help me reach 400 followers as we shall
P-A-R-T-Y!!!!!
Much love, hugs, and friendship
Lynne

Wednesday, February 20, 2013

Tsunami Rose Color Challenge #8

If you are here for the Fire and Ice Blog Hop, please click here


 Tsunami Rose Designs Links 
"Parisian Daydream" Printable Journal Kit 
"Parisian Daydream" Printed Journal Kit 
600 Blog Follower Giveaway
Facebook Page
Facebook Group- Join us for daily inspiration!
Zibbet Shop
Etsy Shop

For my project today, I decided to create a sewing journal for a friend. I’m a seamstress from way back when and when I saw the dress form in this selection of papers, I knew right away what I wanted to do . . . . .


Recipe:
  • Separated pieces of the journal
  • Cut brown card stock sheets from Recollections into 7 x 11 pieces and scored at 5.5 inches and folded in half using Martha Stewart Scoring Board
  • On the bottom edge, used my ATG gun and glued the bottom closed which will create a pocket
  • Cut pieces and arranged on the brown cardstock with also incorporating Recollection Fashionably Chic for the background
  • Made an accordion pleated piece 8 x 7 inches with scoring at every ¾ inches to insert pages open side in to create the pocket
  • Pages are inserted in every other fold with when page is open using ATG gun a piece of 1-1/2 inch of pink recollection paper for the inside binding
  • Using ribbon from discount bin at JoAnn Fabrics and Crafts on the outer edges cutting 3 pieces at 3 - inches and gluing to front and back of spine to create spine jacket
  • Same ribbon was also used to then cover the front and rear spine along with the 3.5 inch ribbon pieces
  • Tim Holtz embossing folders Sewing and Measuring Tape Set for Sizzix and Alterations Pattern and Stitches Set for Sizzix were used to create embellishments which were then also inked
  • Hero Stamps Sew Stylish, Tim Holtz and Close to My Heart Tailor Made and Simple Stitches stamps were used to create embellishments
  • Recollections Floral Embellishments were added
  • all edges were inked with Tim Holtz Distress inks


Unfortunately, this is a work in progress but hoping you like what has been created thus far . . . .

God Bless you and thanks ever sew much for stopping by today and help me reach 400 followers as we shall
P-A-R-T-Y!!!!!
Much love, hugs, and friendship
Lynne

    Tuesday, February 19, 2013

    Butterfly Eyes

    I absolutely love love love this digi of Heather Valentin – Butterfly Eyes which will soon be retiring on her store site and for only a dollar . . . what a deal!!!!! I love combining teal with purple as a color combo!


    RECIPE:
    Background was cut 6 x 12 inches using DCWV Royal Garden Stack
    Butterfly Eyes colored with my Spectrum Noir Markers
    Sentiment from Create with TLC which had been a freebie
    Foil butterfly from K&Company Susan Winget Die Cut

    God Bless you and thanks ever sew much for stopping by today and help me reach 400 followers as we shall
    P-A-R-T-Y!!!!!
    Much love, hugs, and friendship
    Lynne

    I am entering this card in the following challenges:

    The Stamping Chef New Release Tuesday - Nyamh and Flash Dancer

    Its a new release Tuesday at  The Stamping Chef !!! Today she has cooked up for several goodies for you and I decided to be an "over-achiever" and make a card with both of them . . . are you ready??? 

    "Nyamh" reminded me of one of those people that go around with the singing telegrams . . . . well, with this being said, here's my version with her singing "Happy Birthday" to a very dear friend of mine, Edwina Brown. If you know, Edwina, please wish her a happy happy birthday also!!!!


    Now, for the recipe:
    • she was colored with my Spectrum Noir Markers, eyelashes and eyes were colored using my Gel Pens with additional shading and coloring with my Prisma colored pencils
    • card was cut using pink Recollections paper cut 5 x 11 inches and then scored at 5.5-inches using Martha Stewart Score Board
    • background was cut at 4.75 inches x 5 inches 
    • corner punch was used on the bottom corners along with a musical note in the bottom right corner
    • pink nylon net was added to her hat with a tiny pink box from 1/8 inch pink ribbon
    • white pearls were used for earrings and rhinestones were added to the top of her bustier; with grey pearls as the buttons on her boots
    • sentiment is "Happy Birthday" which was then puff-dotted on my card with musical note brads
    For my next creation, I used "Flash Dance". I must say that this should have been "Flash Dance" BUT, with those "doe" eyes; all I could think of was Olivia Newton John and the song "Physical" and just let the "animal" in me loose!!!


    Now, for the recipe:
    • she was colored with my Spectrum Noir Markers,   eyelashes and eyes were colored using my Gel Pens with additional shading and coloring with my Prisma colored pencils
    • card was cut using black Recollections paper cut 5 x 11 inches and then scored at 5.5-inches using Martha Stewart Score Board
    • background was cut at 4.75 inches x 5 inches using Blue Zebra Recollection print paper and then embossed with the Darise Musical Notes Embossing folder
    • of course, the sentiment is a verse from "Physical" which was typed on a piece of cardstock and added to my card
    • to complete her ensemble, there is a piece of 1/8-inch blue ribbon for her head band, a blue rhinestone earring and Glossy Accents was used on her bracelet
    Take a few moments of your time to check out my Design Team Sisters to see their creativity with Freebie Friday as I know you won't be disappointed:

    Pam 

    God Bless and Thank you for stopping by today!!! Please take a moment to sign up for The Stamping Chef blog emails and at least try one of the her freebies she is currently offering!!!! You can also find her on Facebook!!! 

    Much Love, Hugs, and Friendship 

    Friday, February 15, 2013

    Fire and Ice Blog Hop To Be or Not To Be That is the Question

    Welcome to Fire and Ice Blog Hop. I know this is a small hop but I promise you all the projects will fill you with heat and desire. 

    Some say the world will end in fire.
    Some say in ice.
    From what I've tasted of desire,
    I old with those who favor fire.
    But, if it had to perish twice.
    I think I know enough of hate,
    to say that for destruction ice
    is also great
    And would suffice.
    Robert Frost

    Don't forget to check out Jearise at Lorby's World as you need to leave a comment to be in the running for a goodie draw!!!!

    Ok, maybe I’m saying that as my card took a walk on the dark and wild side with an oldie but goodie of Heather Valentin’s Cyber Gothic Fairy. . . . .and for that matter right now, I'm not even sure this hop is a "go" .... but here goes!!!!!


    RECIPE:
    • card was cut 6 x 11 using Purple Recollection Card Stock and then scored in half using my Martha Stewart Score Board
    • Heather Valentin Cyber Gothic Fairy
    • silver on background is a scrap from the inside of a frame that I had laying around
    • flames were cut using Make The Cut
    • Cyber Gothic Fairy was colored using Prisma Colored Pencils, Gel Pens, and Spectrum Noir Marker FS6 and EB1
    • gem on necklace from Miriam's Crafting Supplies
    • corners were punched with a decorative corner punch


    The verse on the inside was my own added touch which was hand-written using my white gel pen. . . .

    Hope you enjoy this wild dark side of me You next stop along the way is the very talented and beautiful Edwina which I'm sure will "WOOO" you with her prooject!!!!

    God Bless you and thanks ever sew much for stopping by today and help me reach 400 followers as we shall
    P-A-R-T-Y!!!!!
    Much love, hugs, and friendship
    Lynne

    This card has been entered in the following challenge:
    Lacy Sunshine Challenge Blog - Challenge One Anything Goes

    Thursday, February 14, 2013

    The Stamping Chef New Release Tuesday and Tutorial

    Welcome to The Stamping Chef New Release Tuesday and Tutorial Thursday . … Ok, I admit, I’m late with the New Release but with the past week I’ve had . . . . .

    New Release Tuesday is named Shopping Spree. She’s just adorable not to mention those super cute zebra heels!!!! Aren’t they to die for?? I put the little lightening bolt on the back as I had a pair of shoes similar back a long long time ago sew similar but had the lightning bolt!!!!


    Recipe:
    • The Stamping Chef Shopping Spree which was colored with my Prisma Colored Pencils
    • Heel was cut using My Scrap Chick Feet Pun Cards and Make the Cut and welding the two pieces together at the bottom that the Gift Card fits on top and slides behind the shopping girl after gluing the toe and back of heel together


    • The cute little lightning bolt was added on the back of the heel with putting a piece of pink Recollection paper behind
    • Shoe is a zebra printed Recollection paper
    • Wrote on the back “Happy Birthday” to my niece!!!
     Well, I hope you are inspired and enjoyed my take on Shopping Spree ...

    God Bless you and thanks ever sew much for stopping by today and help me reach 400 followers as we shall
    P-A-R-T-Y!!!!!
    Much love, hugs, and friendship
    Lynne

    Tuesday, February 12, 2013

    Shake Your Ta Ta's Blog Hop

    Welcome to Shake Those TaTa's - Its Mardi Gras Time!!!! Fat Tuesday!!!!! We had such a great parade last year and thought we need to do it again! Let's throw some beads off the floats, get our masks on and party like we've never partied before.

    We have a great group of party animals to showcase their floats and toss some beads. Be sure to give everyone some bloggie love as there will be some blog candy along the way!


    Lynne has some goodies in her stash that one lucky winner will receive if they remark at each stop along the way . . . .

    My project today is not quite what I had hoped for and for this I apologize. Due to some issues Friday and over the weekend, I was unable to craft and Monday,  Cricut and I were not on speaking terms until later in the evening. With this being said . . . .

    I have done a one-page lay-out:


    RECIPE:
    • Treasure Box Designs Treasure Tots Mardi Gras
    • Treasure Box Designs Vertical Mardi Gras Border
    • background paper is DCWV Blossom Song Stack
    • feathers are compliments of Kimberly Pate
    • photo mat is Recollections
    • bead and rhinestones are from Miriam's Crafting Supplies
    • edges inked with Inkadinkadoo
    • journal card from K&Company Hopscotch Pad
    • ribbon from Basic Expressions
    This is the project, I had done last year which I was much more satisfied with.... 


    you know how sometimes your projects turn out phenomenal and then there are those other times where you wonder what was I thinking .... well, today was one of those what was I thinking!!!

    Your next stop along the parade route is the lovely and talented Miriam who I am sure will astound you with her craftiness!!!! I hope you enjoyed my float and know that the next float will be phenomenal as well!!!

    By the way, it is time to shake my ta ta's as this is my 500th blog post!!!!!!

    God Bless you and thanks ever sew much for stopping by today and help me reach 400 followers as we shall
    P-A-R-T-Y!!!!!
    Much love, hugs, and friendship
    Lynne